
Inlayed tail piece, buffed the finish, strung the instrument, and mounted pick guard with pickup
 Yes I have had it strung for about two weeks now. I am vary happy with the way it sounds. I took it in for lessons, and my instructor liked it very much. So did my friend at work who plays jazz guitar very well. Last weekend I added the pick guard and the pickup. I was pleased to hear that the amplified sound is even better than the acoustic sound. I am very relieved that it actually functions well as a musical instrument. Rather than make this my last installment, I will try and get some samples of the sound and post a wave file or two.
Inlaying the tail piece
 Because I bound the pick guard, I noticed that there seemed a slight imbalance of detail between the plain tail piece and the rest of the instrument. So, I decided to work up a design for inlay that would compliment the head stock and finger board inlay. It only took me an extra day or two the get this done, and I think it added a nice touch. The picture on the left shows the inlay cavities routed out.
Final Polishing
 I started the process by wiping the entire instrument with 600 grit wet or dry sand paper. This took quite a long time to do. Unfortunately, I could not find anything finer than 230 grit for my palm sander at home depot. The sander would have made the job much easier. That were a few small spots were a void created an imperfection in the finish. I can touch up those areas later on if I get a chance.
I followed the polishing directions in the book, but I could not find the type mentioned in the first step. I used the Dico brand for clearing up surface imperfections. I got two 6″ buffs for the first pass, and another 6″ pair of soft flannel for the second pass. On the second pass I used the fine Menzza brand compound ordered from Stew Mac. This was followed by a third pass with #7 Mirror glaze using a foam polishing pad.
It was a little difficult to get at some areas with my hand drill mounted in a vice. The area inside the cutaway had to be polished by hand rubbing. I also learned that the wheel can remove quite a bit of material if you are not careful. This happened only once to a small area of the binding. I would prefer a 14″ buff mounted on a real buffing arbor.
Mounting the pick guard

The first time I tried this, I rushed things a little. The piece of ebony that the screw went through split. So I played it acoustic for a week and tried again. I plugged the original screw hole with a dowel, mounted a thicker piece of ebony under the pick guard and managed to properly attach it on the the second try.
I was a little worried about how the pickup would work with the slightly wider neck. But when I plugged it into the amp, and tried it out, I was surprised that it sounded so good. The only thing really dumb was I somehow misinterpreted the wiring diagram that came with the pickup, and my volume knob works counter clock-wise. The tone knob changes from clear to muted moving counter-clockwise. I should have realized that the diagram was drawn looking at the pots from underneath the pots, not from above. As long as it is working, I will not mess with it.
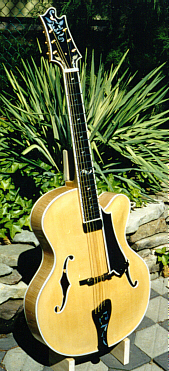
Here is the final product


