The arch top plate carving phase begins
I got very rapid turn around from Stewart-MacDonald’s and Luthier’s Mercantile International. The turn around for the wood was a few weeks, because the lower grade spruce was not in stock. However, Exotic Woods was very helpful with all my requests. They split the spruce wedge for me (but I had to ship it back), so if you do not have a big band saw, remember to ask them to do it when you place the order. I also had them slot and radius the ebony finger board for me for a small charge. I considered this worth the extra money (a small fee at that), because their NC machine can produce more accurate results than I can.
The only materials I still don’t have are the finishing materials, and the amplification parts: pickups and knobs.
Below are a few photos that show progress.
Neck, plates and Tail piece
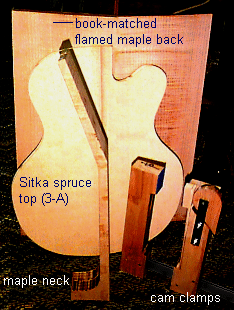
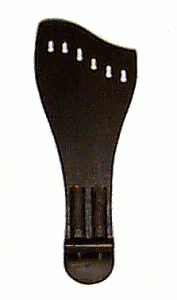
 I have planed and glued the top, back, and neck blank. The neck is a two piece laminate. While I was waiting for the wood for the top, back, sides, and neck, I started working on the ebony tail piece (viewed here from the under side).

Carving the arched top plate
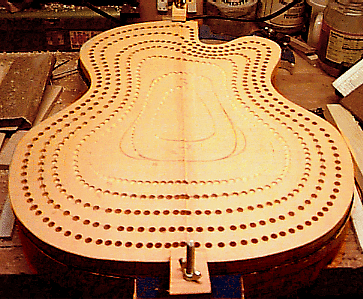
 I used life sized drawings in the appendix of the book to make some Plexiglas arching templates. I then used these to measure how high the top of the plate should be at concentric contours. I drilled a series of holes along each contour at a consistent depth. I had to use my drill press with depth stop, because only the bottom surface of the plate was level. Now I am in the process of roughly carving with a chisel.
Home made cam clamps
While I was waiting for the wood for the neck and body, I also started making some cam clamps with 11 inch reach to glue the cross braces to the top plate. The book showed the use of cam clamps, which I thought would be easy to make. I managed to save some money by making 5 clamps out of maple, and steel. The picture below shows the design.I used 3/4 x 3″ maple. The top and bottom jaws are made from two pieces of maple glued together. Before gluing them, I routed the channels for the 1″ flat iron.
On one of the top pieces I cut away the space for the cam, and rip from the front to about 3″ from the back to form the moving part of the top jaw. Then the pieces are glued together. The bottom is anchored by 1/8″ pins that go through the flat iron. The pins on the top allow the jaw to slide on the flat iron. These saved me a little money.
I am now removing the excess wood from the top and smoothing the outside arch.
