
Finally finished the top sound plate
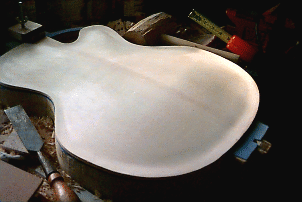 As shown on the previous page, I started with holes drilled at fixed depth along concentric contours. Then I chiseled the surface, and sanded it smooth with a sanding wheel, and an orbital sander. I was careful not to carve below the 1/4″ line drawn around the bottom edge of the plate.
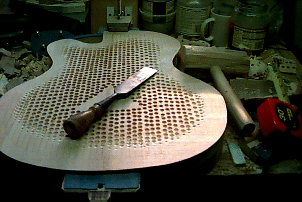 After shaping the top surface, I rigged a fixture to the drill press that I could rest the plate on. I set the depth stop to 3/8″ and drilled holes into the inner surface of the top plat. I rough carved the under side with a chisel, then worked the plate down to a consistent 1/4″ with a plane and sanding wheel. I used my home made thickness gauge to measure as I carved. I needed to strengthen the gauge with a plate of aluminum, after I realized that the wood bent as I pulled the trigger. I should have made the gauge from maple!
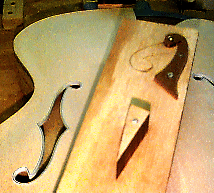 After sanding the inside smooth, I cut the f-holes. They are positioned almost as the book said. However, the body is shaped with a slightly flared waist line, so I needed to place the f-holes down about 1/2″ and increase their angle a pinch to make things look right. Ideally the middle cusp of the hole should be right at the bridge location. The binding had to be pre bent, with boiling hot water. I found that making a slightly reduced shaping jig for top and bottom made things much easier.
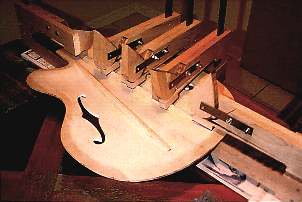 Finally I cut the bracing strips and glued them in place with my home made cam clamps. I chose parallel instead of X-bracing, because I wanted a stronger, less muffled voice. I also saw the note in the book that said you can shape the braces with extra clearance at the ends, adding tension and stronger voice to the sound board. BUT DON’T because the tension diminishes after five years. This is where I considered doing something nerdy but gave up. After all, this is just my first one.
Adding spring tension to the bracing.
I would like to know what other people thing about this. The day after I glued the bracing in place, I got a luthier supply catalog in the mail that showed bracing material that laminated wood with graphite composite material, exactly what I was considering doing on my own. So my question to anyone out there is: do people already use composite laminates to add long lasting spring tension to the bracing, or is it just for making lighter/stronger bracing? What do you think? As long as I have not glued the top plate to the body, it is not too late to change the bracing.
I am now in the process of carving the back plate, which should take less time than the top. I already have what I think is a nice design worked out for shaping and inlaying the peg head. Next month I will include some of these drawings along with some designs for finger board inlays. This is another issue to decide on, to inlay or not to inlay the finger board. I have mixed feelings about the tension between making a simple playable instrument, and expression through craftsmanship. As someone who is deeply involved in visual arts, I find it hard to resist the temptation to add some individual expression to this process. I don’t quite see it the same as mere embellishment.