
Leveled & dressed frets, installed nut, final sanding, applied lacquer, and made the pick guard
Leveling and dressing the frets
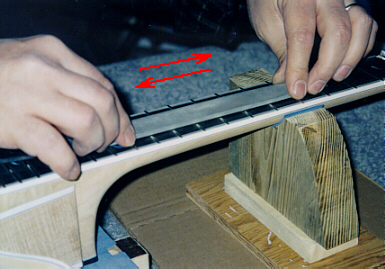 I made a support that I placed two thirds up the neck, to keep it straight while I leveled the frets. A got a large flat fine toothed file and bent the tail up slightly to keep it from striking the frets. I used a series of strokes up and down the entire length of the finger board, working gradually across the entire width of the fingerboard. I looked to make sure that the crowns of all frets were touched by the file. You can easily see which ones have no scratches and were you need to file more. I did not buy any of the fancy fret levelers, so I am counting on the straightness of the file mostly.
 Then I used the fine grit side of a sharpening stone and ran it diagonally across the frets. This left slightly finer scratches on the frets. At this point the frets should be level. When I setup the instrument I will not try for very low action. If there are any buzzing frets, I will have to redo this process.
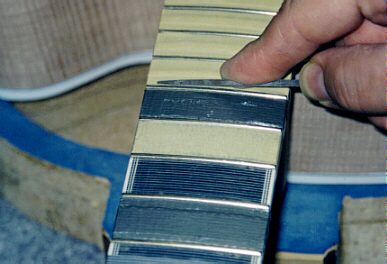
Next I masked of the finger board with duck tape, and used a small fine triangular file to re-crown each fret. It takes a little practice, but with all those frets, you get plenty of opportunity. Once that was done I took 600 grit wet/dry paper and went offer the frets diagonally using a padded sanding block. Finally I used some polishing compound and a small dremil mounted buffing wheel to polish all the scratches off the frets. Then the tape can be removed.
Installing the nut

Some time ago, I noticed a slight miscalculation in the shape of the neck. Where the surface on which the finger board is mounted meets the surface that the head stock veneer is glued to, was about 1/8″ too far from the beginning of fingerboard. I was constrained by the fact that the fingerboard was supposed to be mounded so that the 14th fret is exactly where the neck and body join. I could have slid the fingerboard a little higher, but decided not to. That left a problem in putting a standard sized nut in. The diagram below illustrates my dilemma. Unless I used a bigger nut, there would be a gap in the binding that runs around the head stock. Further more, I had decided a long time ago that I would use a wider nut, and ended the inlay and veneer too far away to change my mind. In hind sight, I should have run the head stock decoration up closer to the fingerboard, and filled in the gap with some extra binding. But on this instrument I was stuck making a bigger nut out of two pieces. I laminated a piece of bone bridge material to the bottom of a rotated MOP nut. This made it high enough to clear the finger board by over 1/8″, and big enough to fill in the wider nut cavity. I beveled the top of the nut to reduce the size where the string grooves need to be filed.
Final sanding using a palm sander
 I already owned an orbital sander, but it had a large rectangular base. I decided to get one of the the Porter Cable models that was recommended in Bob’s book. It does a very nice job. Where it can’t reach I had to sand by hand. If you have the book you know the process. I could not find the grits he suggested for the sander (80-100-230). Instead I used 100 grit to start. Then I wet the entire instrument to let the grain rise. Then I sanded it with 150, followed by, 230.
At this point one would think about a stain. When I wet down the instrument after the initial sanding, I get a glimpse of what a natural lacquer finnish might look like. I liked it so much, I decided to keep it simple. The figure in the grain is striking enough to make it look nice on it’s own, and the color will only mellow and get deeper over time.
Applying a natural lacquer finish
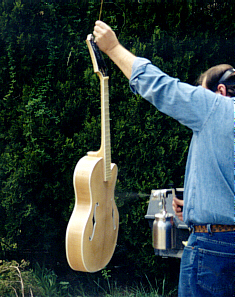 I purchased a nice new spray gun, and hooked it up to a compressor that my father in law gave me years ago. I also got a respirator with the purple filters in it to keep me from getting woozy on the lacquer vapor. This photo was taken on the back patio. I actually sprayed mostly in my shed, but the shed it is cramped and my wife refused to go in and take the picture if I was the only one with a mask. The book called for five coats with about one hour drying time between coats. I applied six because the spray was a little light. I let it dry over night, then I sanded it flat with 220 sand paper, using both the Porter Cable palm sander and hand sanding. The term flat sanding means that the entire surface should be made dull, with no low lying glossy spots. The a final heavy coat of lacquer is applied. The lacquer is left to cure for two weeks before it can be buffed. In the mean time I started on the pick guard and other details.
Making a pick guard
 I designed a pick guard that was differently shaped, and sized in-between the narrow and large versions in Benedetto’s book. I wanted to mount it without the metal support that the larger pick guard requires, and still have enough room for two pots (volume and tone). I started with a piece of veneer normally used for head stocks. I used the same style of binding on it as the body. I used left over ebony from the tail piece to glue a supporting block in the bottom. A space was routed for a suspended Benedetto humbucker.
Seating the bridge
 I decided that the bridge was one item I would just order instead of make. I followed the book’s procedure for seating the bridge. I taped medium grit sand paper to the top plate. The book showed a jig for holding the bridge, but I simply held it firmly and wiggled it against the sand paper. You have to be careful that the piece does not tip forward or back as you do this.
Eventually the sand paper began to indicate that the feet of the bridge were contoured to match the top plate. The more even the black smudges get the closer the fit. I had to lift off the paper once to check the fit. A little more sanding resulted in a correct fit.
This weekend I should be ready to wipe and buff the instrument and start setting up. I am still waiting for the electrical components I ordered. At least I will be able to string it up and see how the acoustics are some time next week. I also started inlaying some pearl on the tail piece. If my site has enough space left I might try and capture some digital sound to let people hear what it sounds like. Of course I will try to get a few better quality pictures of the final results.